Bulk Update Tasks
With this feature, staff members and providers can save time and effort by updating multiple tasks at once from the provider web app, reducing manual redundancies in task management.
How it Works
From the Tasks tab, select the Bulk Task Update icon.
Select multiple tasks and subtasks from the list view or board view for bulk actions by selecting Edit to bulk edit or Delete to bulk delete. NOTE: Users will only be able to update provider assigned tasks.
Upon selecting Edit in the step above, a dedicated bulk action toolbar appears, where you can perform bulk actions including updating assignee, status, priority, labels, due date, comments, and task pool assignment.
Upon making your changes, you can then click Preview Changes to review prior to applying your changes and view any selected tasks that have conflicts or update restrictions.
Click Preview Changes.
Review and then select Apply Changes.
You can view associated automations that will be triggered on bulk update for the selected tasks. Additionally, changes will sync across the platform and are logged in task audit histories.
Learn more about Bulk Update Tasks
Keyboard Shortcut Option for Sending Messages" Drawer
Users now have the option to use a keyboard shortcut for sending messages or entering a new line in the message
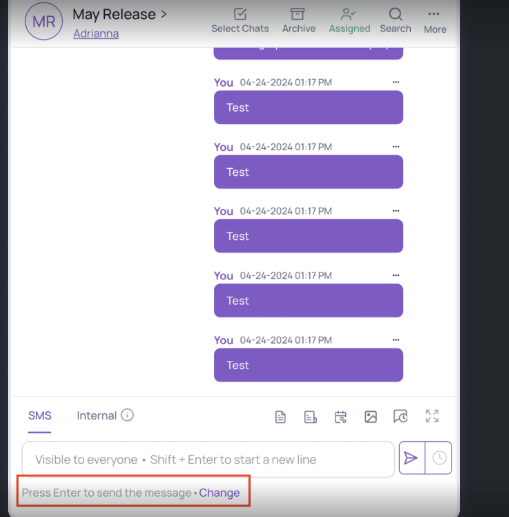
Underneath the message window, users can change their settings for utilizing the Enter button to either send the message or create a new line upon hitting “Enter” on the keyboard. Note the current setting will display in this view. In the screenshot below, the current setting is upon pressing “Enter” the message will be sent.
Upon clicking change you will be displayed with 2 options:
a. Send the message: when selecting this option, a message will be sent when pressing “Enter” on the keyboard. To create a new line in the message you are typing, you will have to press “Shift + Enter”.
b. Start a new line: when selecting this option, a new line will be created when pressing “Enter” on the keyboard. To send a message from your keyboard you will have to press “Shift + Enter”.
Take Photo from the Fold Grow App
With the latest update to the Fold Grow App, practice users can capture and upload patient-related photos directly into the patient profile, eliminating the hassle of saving photos on their devices.
How it Works
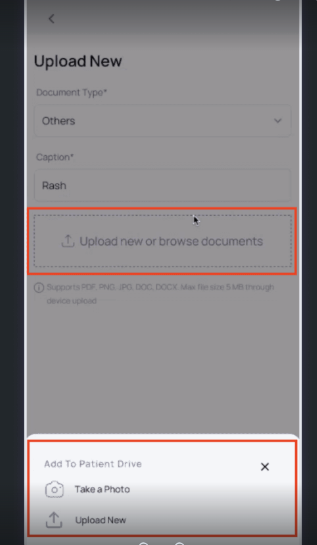
Users can add documents and capture photos directly within the Fold Grow App. The photo capture feature can be accessed from Patient Profile> Documents section > Select the “+” button.
Upon selecting the + button, select the document type (this is where this document will live in the patient profile documents section), click on “Upload new or browse document,” and select Take a photo or Upload New.
Switch between front and rear cameras for better photo capture by selecting the icon in the bottom right corner of the camera view.
Review captured images for quality and relevance before saving and cancel image capture to retake photos without saving the initial shot by clicking the “x” next to the photo.
Photos added via the native app also sync to the web app's document section. They are also accessible to the corresponding patient on their app in the documents section.
Update Contact Display
Users now have the option to modify the display title of their SMS and Call conversations within Fold. This feature offers greater flexibility and customization for managing conversations when multiple members/prospects utilize the same phone number.
How it Works:
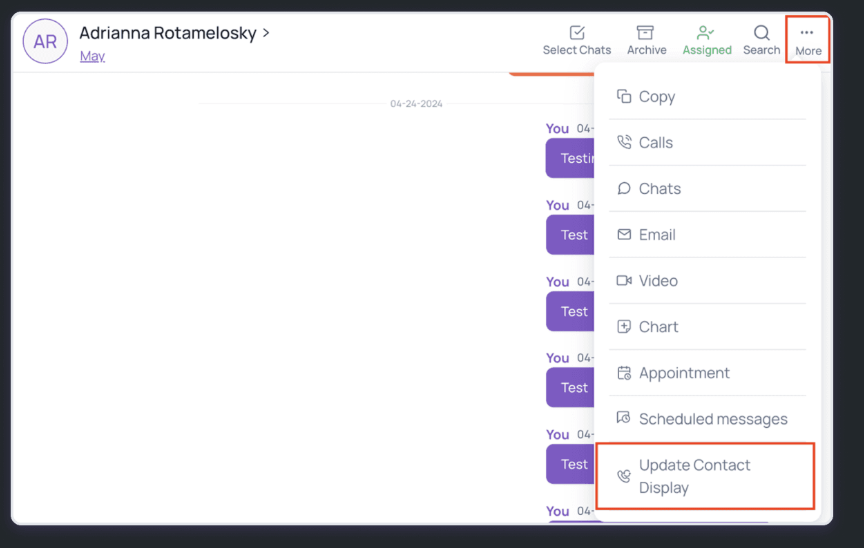
From the SMS tab, select a conversation, then select the
'Three Dots' (...) icon within a conversation, and click "Update Contact Display."
Upon selecting "Update Contact Display," a drawer will slide open, presenting the Current Contact and List of Contacts.
a. Current Contact: This will be selected and is the first name and last name of the member/prospect under whom the conversation originated.
b. List of Contacts: A section displaying all contacts associated with the phone number, arranged alphabetically. Users can choose to update the display title by selecting a contact from the list.
If you choose to update the display title by selecting a contact from the list, the following changes will occur:
a. The existing displayed contact will be relocated under the contact section.
b. The chosen display title will be updated to reflect the latest selection.
Track Note Versions with Audit Trail
Practice users can easily monitor modifications and access history for patient notes.
How it Works
Navigate to the Patient profile, select the notes tab, and then select View on a particular note.
Select any entry in the audit trail to view the note as it existed at that point in time.
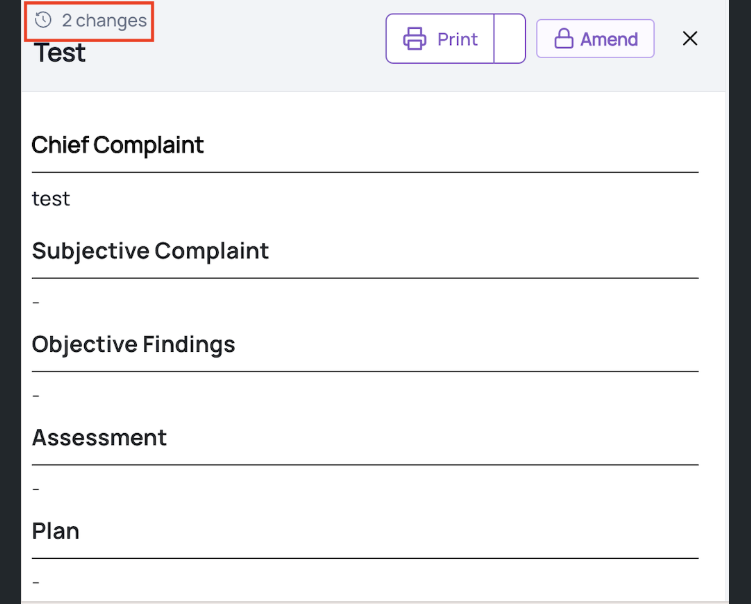
Select any entry in the audit trail to view the note as it existed at that point in time.
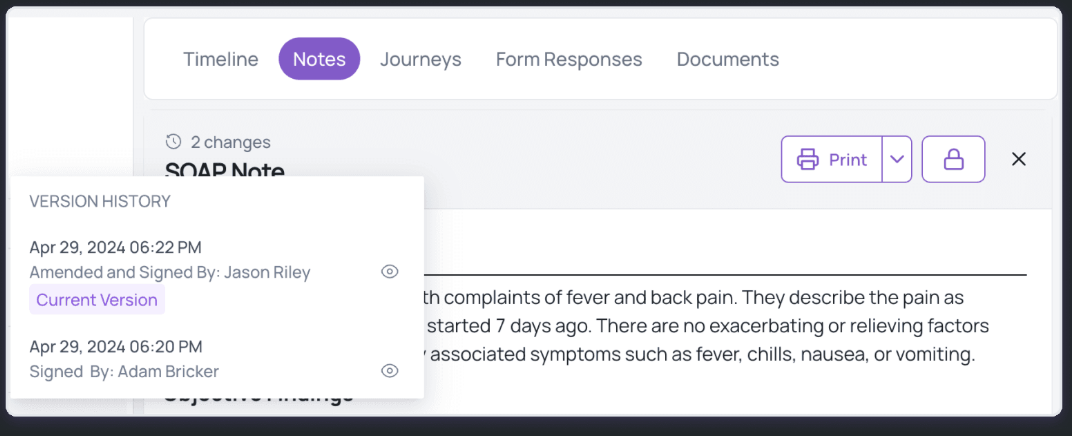
Upon selecting any version you can print the current or previous versions for documentation or reference purposes by selecting Print.
Security and Access Control: Access to the audit trail for notes is available to all users with patient profile access.
Action Details: View user, version, timestamp, last action performed for each entry.
Exclusions: This feature is available for notes created/signed on the Fold platform, excluding notes from Elation or encounter summaries from Athena.
View Notes on Patient App
Patients can now access notes created by their providers directly within the Fold patient apps, enhancing transparency and collaboration in care management.
Comprehensive Note Visibility:
Patients may gain access to notes associated with their profile on Fold and the underlying EHR through both the patient web and native apps.
Customized Configuration Options:
Within the form builder view in Settings> Content> Forms, practice users can designate notes for patient display by toggling the "Share with Patient" option.

The system also allows for toggling this setting on a per-note basis on the patient profile. This helps override the form settings for a particular note, for a given patient. From the patient profile, go to the Notes section, select the note, then toggle on or off the “Display Note to Member” option.
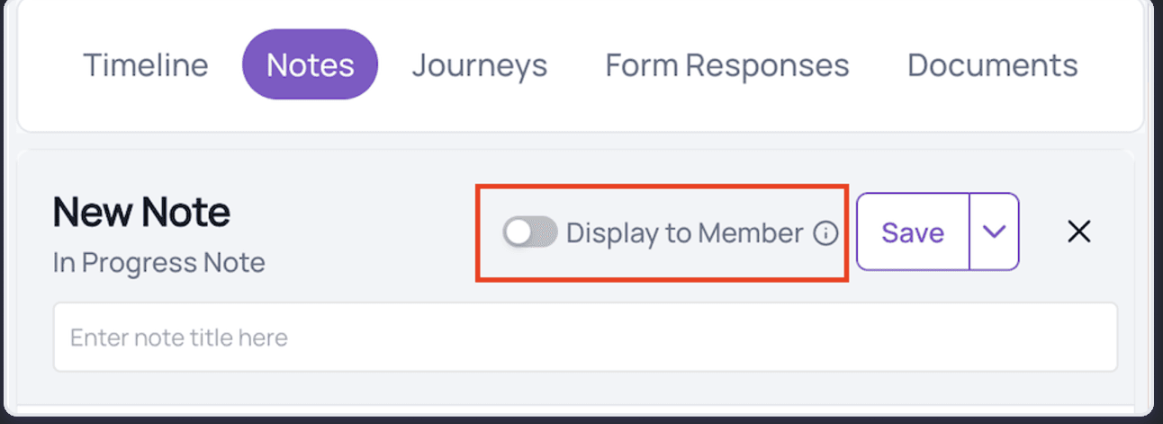
Only signed and amended notes are visible to patients, ensuring only reviewed information reaches the patients.
Patients can view essential note details such as template name, status, date, and comprehensive note contents, empowering them with a deeper understanding of their medical records.
This feature will not be available in conjunction with Elation as the underlying EHR.
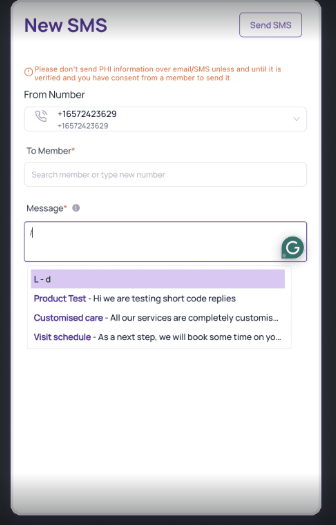
Template Responses in "Send SMS" Drawer
We're thrilled to introduce the ability to access and send template responses directly from the “Send SMS” side drawer!
Template Responses in "Send SMS" Drawer
Users now have the option to utilize template responses directly from the "Send SMS" drawer, streamlining the process of composing and sending messages.
How it Works:
When composing an SMS message using the "Send SMS" drawer, users can now access their template responses within the interface by entering a backslash (/) into the message window. Users can then browse through their available template responses and select the one that best fits the current conversation or scenario.
After selecting a template response, users can customize it if necessary and then send the message seamlessly, all within the "Send SMS" drawer interface. In the example below, the user selected “Product Test” in step 2 and then the template displayed in the message box “ Hi we are testing short code replies”.
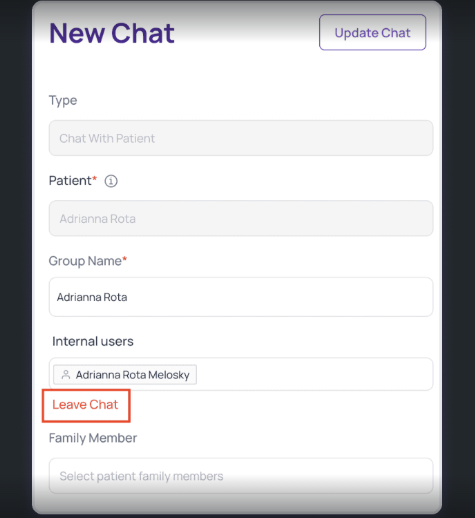
Self-removal from Chat Groups
This enhancement provides users with greater control over their group memberships, simplifying group management and promoting a more streamlined communication experience.
How it Works
Click on the chat, upon clicking on the chat there are 2 ways to remove yourself from a group.
a. Select the members.
b. Select More and then select Edit Group.
Select Leave Chat to then leave the group.
Group Admin Considerations: If the user attempting to leave the group is the group admin, they will encounter a pop-up message prompting them to assign a new group owner before leaving. This ensures a smooth transition of ownership within the group.
Conversation Management: Any conversations assigned to the member leaving the group will automatically become unassigned, ensuring continuity and clarity within the group's discussions.
Exception Handling: In scenarios where a chat group has only one internal member remaining, users won't be able to leave these groups, preventing accidental removal and ensuring group stability.
Enhanced Contact Type Management in Leads & Contacts Section
We're excited to announce the latest update in Fold, introducing enhanced contact type management within the Leads & Contacts section. This update brings more flexibility and efficiency to organize your contacts based on distinct contact types.
Key Features
Distinct Contact Type Tabs: Each tab within the Leads & Contacts section now represents a distinct contact type, streamlining the organization of your contacts. You can view additional contact types by selecting the 3 dots highlighted below.

Renaming Initial Tab:
The initial tab has been renamed from "Leads and Contacts" to "Leads" for clearer differentiation.

Adding New Contact Types:
When adding a new contact, users are required to navigate to the relevant contact type tab. For example, if you're in the "Visitor" sub-tab, the system will pre-fill the contact type as "Visitor" while allowing flexibility to choose another contact type if needed.
Export Lab Results from Patient App
Patients now have the ability to export their lab reports directly from the patient web or app interface. Whether the data is in file format or structured within the app, patients can easily access and save their lab results in supported file formats.
Key Features
Export Option for Lab Results: Patients can download their lab reports on the patient web and native apps. This option will be available for each structured lab result and for each file in an unstructured lab result. Simply click the export button for each report, with a confirmation prompt to avoid accidental exports.
Comprehensive Information: Exported structured report files include all necessary details like patient name, gender, DOB, lab name and report date.
Convenient Storage: Exported files are saved directly to the local device folders for easy access.
How it Works
Open lab report from patient web/native app.
Click on the download icon.
NB: This feature will be available only in conjunction with Athena and Elation as the underlying EHR.
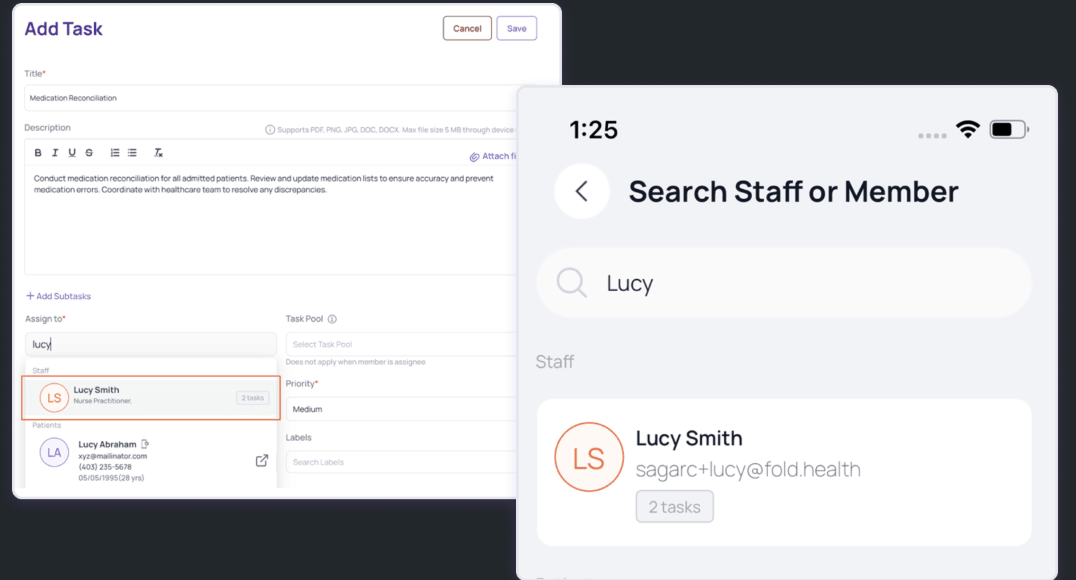
Enhanced Task Assignment Visibility
Now, when assigning tasks on provider web and native apps, users can efficiently manage workload distribution by viewing a combined count of pending and missed tasks against each internal user in the dropdown menu. This feature, available on both the Provider web and native apps, offers valuable insights into workload balance, ensuring tasks are assigned effectively.
How it Works
Search for a staff member to assign a task.
View total count of pending and missed tasks against the staff member.
Additional Features
Scheduling Default Selections - Scheduling an appointment from the Calendar will default the user to the logged in user, and the location to the logged in user’s primary location.
Add Task in a Task Pool from Automations - While configuring a task within an automation, users will be able select a specific “task pool” for the task and also select an assignee from the task pool user list.
Call Recordings and Transcription - We've enhanced our call recording and transcription feature to operate on a flag-based handling for both incoming and outgoing calls. If you require this feature, kindly contact our customer success team to have it enabled.
Lab Report UX Enhancement on Patient App – We have implemented a fix for minor alignment issues in structured lab results on the patient app.
Task Analytics - The Task Added vs. Task Completed widget will now dynamically display weeks as labels when a user selects a date range of less than a month.
Was this article helpful?
That’s Great!
Thank you for your feedback
Sorry! We couldn't be helpful
Thank you for your feedback
Feedback sent
We appreciate your effort and will try to fix the article